Getting the Box ready
Install the base operating system and boot the self-hosting box, before the applications and services
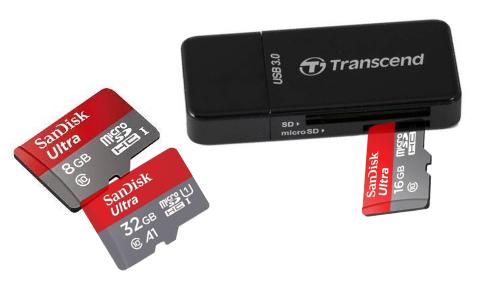
Selecting a Micro-SD card
For most SBCs, the boot device is a microSD card (sometimes called a TF card). These are tiny storage devices which come in categories based on speed and size. A size of 32G is the smallest one can get nowadays. This is ample for most server boot devices. Do not buy the fastest rated card available as, invariably, the SBC’s controller is not capable of reading the data as fast the the card is capable. The premium paid would be wasted. Instead, buy a reasonably priced card, which is designed to last longer..
Accessing the card
The tricky part is preparing the card by writing to the card. A few years ago, most laptops had a small slot at the bottom to insert an SD card. This was really useful to prepare the card. Some card vendors provide a SD adapter for the micro-SD card, which allowed us to simply plug in the SD adapter with the micro-SD card into the slot in the laptop.
But this is no longer the case. The slot on the laptop existed to transfer photos from a camera to a laptop. Cameras used SD cards, and transferring photos simply meant plugging in the camera’s SD card into the laptop. But lately, dedicated cameras have given way to mobile cameras, and images are simply transferred through the Google/Apple cloud. Newer dedicated cameras also have built-in WiFi to transfer photos.
As a result, laptop manufacturers have stopped including this slot. This can prove quite a challenge. The only option would be to buy a USB card reader. Many manufacturers sell one that reads not just the SD card, but several different card types.
It might be worthwhile to get one of these card readers. It helps prepare the microSD, and also transfer photos from older cameras. It allows you to retain accessibility to MicroSD cards in the future too.
Writing to the card
Before using the MicroSD card, either for the first time, or reusing the card, always format it first with SD Formatter. This resets the card to a factory-default, making it good as new.
Most distributions provide an img file for the base file system. This may sometimes even be compressed, and the resultant file will have an extension of “.img.xz” or “.img.bz”. Each distribution provides instructions on writing the img file to the SD card. Some recommend use of a tool called Balena Etcher, or USB Imager, or Rufus. All these tools work well. Etcher is a little heavy, the other two are very bare-bones.
Often, they also provide a series of Linux shell commands to write the image, involving use of the command dd. Do not do this unless you know what you’re doing, because you are easily capable of blowing the whole system if you provide the wrong disk name.
Booting & Logging in
Many distros provide the capability of performing a headless first boot; that is, it allows you to set up the device without connecting a keyboard or monitor to it. This can work only if:
- You have connected the device using Ethernet. If you plan to use WiFi, you have to connect a keyboard/mouse/monitor to the device and set up the network manually.
- You know the IP address the box has been assigned. This is not too difficult to find out. IP addresses are typically handed out by routers. Routers keep a list of such addresses, so get the address from the list. If. for some reason, this does not work out, there are some tricks that can be done (like broadcast ping and ARP query) to find the addresses.
Logging into the device is the final step. This allows you to do the initial setup and perform the basic configuration as a pre-cursor to setting up all subsequent applications and services. This includes creating a user account, and changing the password and network configuration etc.
If the distro does not support headless initial setup, you would require to connect a monitor and keyboard and use a wizard to set up the system. This is actually very convenient to do, even if the distro supports headless setup.
For headless initial setup, we would first need a SSH client. Linux and MacOS computers generally come pre-installed with SSH clients. For Windows, the most popular client is PuTTY. Download and install PuTTY first.
Connect to the new device using the user name and address. Different distributions have different default login/passwords configured. Armbian allows root-login at initial setup, which is subsequently disabled. ArchLinuxARM uses username/password “alarm”.
Configure the base user account, and configure super user access with “sudo” for the account. Once this is in place, we are good to move on to applications.